
Here’s the complete guide we can provide you with a step-by-step guide on how to install an SSL certificate on an Azure Virtual Machine (VM). Keep in mind that the exact steps might vary depending on your specific circumstances, so always refer to the official Azure documentation for the most up-to-date information.
Here’s a general guide:
Prerequisites:
- SSL Certificate: Purchase an SSL certificate from a trusted Certificate Authority (CA) or use a free certificate from Let’s Encrypt.
- Azure VM: Have an Azure VM up and running. Make sure you have the necessary permissions to manage the VM.
Step 1: Connect to the Azure VM
Use tools like SSH for Linux VMs or Remote Desktop for Windows VMs to connect to your Azure VM.
Step 2: Prepare the Server
Ensure that your VM has a web server (e.g., Apache or Nginx) installed and properly configured.
Step 3: Upload SSL Certificate
Transfer your SSL certificate files (private key, certificate, and CA bundle if applicable) to your Azure VM. You can use tools like scp for Linux or WinSCP for Windows.
Step 4: Install Certificate
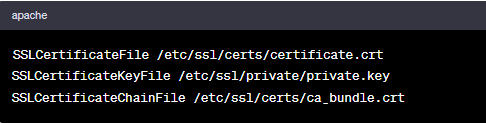
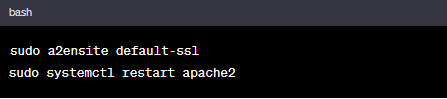
For Apache:
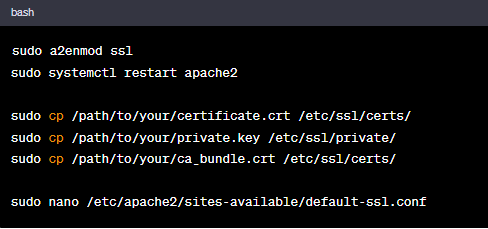
Edit the SSL configuration:
Restart Apache:
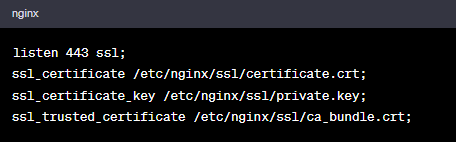
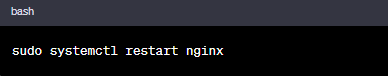
For Nginx:
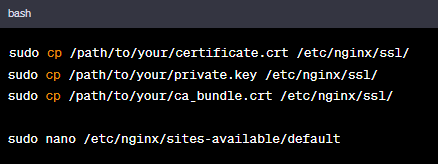
Edit the SSL configuration:
Restart Nginx:
Step 5: Update Azure Network Security Group (NSG)
Ensure that your Azure VM’s NSG allows traffic on port 443 (HTTPS).
Step 6: Test
Open a web browser and navigate to https://yourdomain.com to test the SSL installation.
This is a general guide, and the specific steps may vary based on your web server, Linux distribution, or other configurations. Always refer to the official documentation for your specific technologies and services.
Read More Blogs Sportechhub And Also On RackSolutionsLLc